Showing posts with label drip irrigation. Show all posts

Saturday, October 9, 2010

Make old junk into plant containers!

Thought I'd share with you what we've done for our part in recycling unwanted concrete water pipes from the past.

I found these great old concrete drainage pipes and thought, "you know, a plant would look awesome in this thing!". So next thing you know I used all my strength to put these heavy old relics into my truck, took a short break then moved them into our yard :) They really are heavy and when I look at them I wonder how I got them here...I say the same thing about most of the yard and garden art we have! lol

So here is a few pics of where we put these old water drainage pipes and how we ran drip line up the middle to help water our future plants.

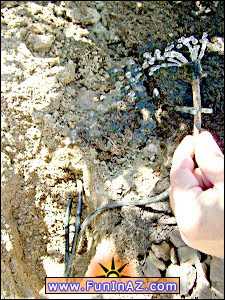
This is where we placed the smaller of the two water pipes. Don't mind the rain drops in the pictures,the rain finally showed up and made it a great day to work outside! This second image shows the tools you will need to complete this project: Something sharp to poke a hole into your main drip line, an elbow connector and some 1/8" drip line tube.


Next, you'll have to lay the heavy water drainage pipe on it's side to get to the main water line that we need to connect to. Once you have room to work, you'll need to dig down and find you main water supply  line. Remember to dig carefully so as not to damage your water line!


Now poke a hole into the main water supply line and insert the elbow drip line connector. Place the 1/8" drip line onto the elbow before inserting the elbow into the main water line to make things easier. You will  also want to push the 1/8" drip line into the hole of the water pipe so when you put the water drainage pipe back up, you can grab it.


Fill the hole back in with dirt and stand the drainage pipe back up. You should now be able to look down inside the pipe and see your dip line tube. You will also want to note that the line should not have any part of the concrete drainage pipe sitting on it. Your new 1/8" drip line tube should be cut off no less than  6" above the opening and capped off until you have a plant to place. I like to leave a little extra drip line, about 6"-10", and coil it under the dirt beneath the plant in case you have to ever make repairs such as adding a different size emitter head. A lot of times once you put on an emitter, the sun will bake it onto the drip line making you to have to cut the drip line just before the emitter, thus shortening your drip line and eventually causing you to use in-line connectors which increases the chance of leaks. (leaks would not be a problem in this set up, however they would be if your doing horizonatal repairs, so it's a good habit to create when installing drip lines.)


Now the job is complete!
For ease of access you can see I've kept the drip line sticking out of the top of this great looking water drainage pipe for now. It's just waiting to water some interesting plant in the near future. The easy part is over, the hard part is choosing a  cool plant to put in it :) You could plant something that hangs down, something that grows up, or even plant both to give an extra cool look!

Thursday, September 16, 2010

Fixing the drip line to the citrus after punching a hole through it for drip line stake

The first image shows a big rut made by the large volume of  water caused by the hole in the drip line.
The next images is of clearing the rock  away to make the repairs.

Next dig down until you find the problem. I found a hole in two drip lines, so make sure you check all lines in the area so you don't have to dig it up again!

Now cut out the section of drip line with the holes in it.

Replace the cut out section with new 1/8" drip line and a in-line connector at each end.
Make sure to pay attention and not let any dirt get insdie the open drip line.

Now that you have made your repairs, turn on the water and check for leaks. As you can see we have water flowing out of our emmitters and zero leaks. Next bury the lines and put everything back how it was and nobody will ever know you made a bonehead move and poked holes in your drip line - unless you post it online on your blog HA HA HA!!!

Friday, September 10, 2010

Planting some more cactus in the morning!

I plan on planting more cactus in the morning along a wall that gets a lot of sun. I plan on planting a few of what I now know are called "pinecone cactus". They are thos gray looking cactus that get a beautiful white flower. I'll post some photos after I get them in the ground to show you, however I did take a picture of one or two mixed in with other cactus cuttings a while back if you wanted to look there.

Also, I will be making a repair to a drip line that I punched a hole through while extending my citrus tree drip lines. I noticed a large river of water had made a groove into the new steer manure mulch I added last weekend, so tomorrow I will have to explore a little and find out where and how I did that. I'm thinking I poked a hole in the smaller drip line while trying to install the drip line stakes I needed to keep the emitters at the right place without ever moving...we'll soon see :)

Tuesday, July 6, 2010

Our second raised garden

While waiting to complete the new valve installation I decided to build another raised garden bed on the other side of the yard. This garden is half as big as the first one, only 10' x 3', a perfect size for our location.

As with the first garden we built, we wrapped the pine 1" x 6" boards with 6 mil black plastic. This should also help us during the winter to warm our soil just a little.

The plants behind the garden are star jasmine which should do fine even with a little extra water now and then. They smell great and look really nice once established. It is hard to see it in the photo, but we have attached green tree wire to the wall for a home made trellis. It will do double duty when the taller veggies arrive :)

The plan is to use one eight head drip emitter that will feed all the water through a few soaker tubes snaked through the crops. Changes will follow with growth habits...

100% finished with the new valve set up

So here is what it looks like:

This angle is hard to look at I know, however you get the idea. I plan on adding more rock around the new box later in the week. It really looks good now and there is just enough room next to it for our second garden we just built! So now we have a dedicated raised garden valve set up and two gardens!

Other irrigation photos


Always use wire nuts that are water proof for your in ground boxes.
This is the existing valve box. I ran new wire here as well as to the new valve box because the crew who installed this box/wire had spliced multiple strands together. This made it very confusing at the timer since the colors never matched correctly at the box / timer.
This is the new valve box I installed. I opened the wire casing and jumped off the white neutral and two others for these valves. I did this because this box is behind the existing box.
Here is my irrigation timer. The white wires are the commons / neutrals from each wire strand, (I have a valve for the front yard that has t's own wire loom). The two red wires are for the front & back yard shrubs, the blue is for our citrus and the green is to our new gardens!!! You can wrap the wires around a phillips screwdriver to make the neat curls you see here.

Sunday, July 4, 2010

The new two valve manifold is finished!

Finally we have the new two valve manifold in the ground and completed! All that is left to do is to bury the 100' of direct burial 7 strand wire and turn on the water to the new raised beds!

What was going to be a simple install of two new irrigation valves to our newly built raised gardens turned into a bigger project than what we had expected. Not that any of it was hard, it just took longer than we had thought. I'll explain later on why it took so long; it had nothing to do with the installation of the parts nor the hot, very hot weather, so please don't be discouraged to do this yourself.

Here are a few photos of the installation process of the new two valve manifold with in-line filters and pressure regulators. You need the pressure regulator or else you'll blow the drip heads, (emitters), off your drip line.

2) 1" Rainbird DVF valves
2) Pressure regulators
2) In-line filters
Thread seal tape
Couplings / bushings / pipe
Channel lock pliers
Valves are now and ready to be attached to the pipe.
Everything is now glued to 3/4" pvc pipe and considered a two valve manifold.
This installation took a little longer because I added this valve set up behind the existing box. Still worth every minute to install.
The outside valve has poly tubing pinched with more poly tubing to keep out dirt / bugs. To do this cut a 5" piece of tube, bend it half and cut a slit in the middle. Open this piece of tubing and slide it over the poly tube coming from the valve. This will close off that poly tube. This valve is now for future use.
I'll give a parts break down as soon as I can, after all it's 4th of July!!!
Time to BBQ :)

Thursday, July 1, 2010

Almost finished with the new two valve set up

I'll have to post some photos showing the two new Rain Bird valves I have installed specifically for the gardens. I am almost done and it couldn't be at a better time! It's hard digging an 8" deep trenche over 150 feet with a pick ax when it's 113 degrees out, let me tell you :)

I'll get them up some with explanations on why I choose what to install.
Related Posts Plugin for WordPress, Blogger...