This was my first idea for a frost cloth frame for our smaller raised garden bed.
I bought 10' sections of 1/2" pvc pipe for under $2. I cut 4' pieces for the corners and then connected the entire 10' section of 1/2" pvc pipe along the length side of the raised garden.
Although the bright white color of the pvc pipe is unsightly, it seemed like it would work great. There is some slight sag in the middle of the 10' sections, but nothing to worry about. I did not use any glue when constructing this frame.
This is how I attached the 1/2" pvc pipe to the wood raised garden bed. I only used one for each pvc post, but am going to be adding one more at the bottom for each pvc post.
After finishing this frost frame project, I had some things I wanted to change. First, I am going to shorten the pvc posts since I will not let any plants reach that height anyway. Second, I will remove the 10' sections of pvc pipe running lengthwise and replace it with wire for a better look. I could have painted the pvc, but with out extreme summers the paint would more than likely flake off really fast.
I will post more updates on how the frost frame is coming along. Just a quick side note: This frost frame worked like a champ and may be great for your garden, however my circumstance within an HOA community makes me think that I need something a little more incognito :)
Follow along with me as I create and maintain organic raised garden beds and landscape in the extreme and unforgiving Arizona desert! Learn, share and ask questions. Together this garden blog will provide valuable knowledge of working organic principals to create your own mini ecosystem. Let's make the garden the first place you want to go and the last place you want to leave!
Showing posts with label raised bed garden. Show all posts
Wednesday, December 1, 2010
Frost cloth frame idea #1
Labels:
"frost cloth",
Arizona,
AZ,
freeze,
gardening,
growing vegetables,
raised bed garden,
vegetable garden
Tuesday, November 2, 2010
Our Arizona raised garden bed update: Day 10
These are our Arizona raised garden beds. It has been about 10 days since we planted our seeds and look at what's growing now! I have sprayed them one time with the organic fertilizer spray I mix up. To make this organic fertilizer spray yourself is simple.
Mix into a 1 gallon pump sprayer, then fill with water:
1/3 cup of liquid seaweed
1/3 cup fish emulsion
A splash of vinegar
Use this to spray on the tops and bottoms of your leaves as well as onto the ground soil below as a safe and organic fertilizer. I use this about twice a month, may be more in the summer months. It helps to protect from insects, root rot, heat stress as well as having many more great qualities.
Mix into a 1 gallon pump sprayer, then fill with water:
1/3 cup of liquid seaweed
1/3 cup fish emulsion
A splash of vinegar
Use this to spray on the tops and bottoms of your leaves as well as onto the ground soil below as a safe and organic fertilizer. I use this about twice a month, may be more in the summer months. It helps to protect from insects, root rot, heat stress as well as having many more great qualities.
Labels:
Arizona,
AZ,
companion plants for vegetables,
fertilizer,
fish emulsion,
gardening,
growing vegetables,
liquid seaweed,
organic fertilizer,
raised bed garden,
wild flowers
Monday, November 1, 2010
Our raised bed gardens are doing great here in Arizona
Just took a stroll through the garden and have to report many plants starting to grow. Much better results than I was expecting. This is our firts attempt at gardening and we could not be more happy with our current results. I will post pictures as soon as I can.
Labels:
Arizona,
AZ,
no till gardens,
raised bed garden,
seeds,
vegetable garden,
wild flowers
Sunday, October 24, 2010
Soaker hose
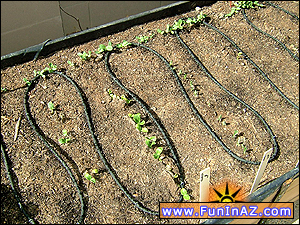
We have decieded to install soaker hose in our raised bed garden and see how well it works compared to standard drip line and drip emitters. One thing I did was use about a 8" piece of drip line tube to connect the soaker hose to our eight head emitter. This will allow the water to flow through the standard drip line and into the soak er that is in the soil. If I were to hook up the soaker hose right into the eight head emitter, I would have water leaking from the soaker hose where I don't want or need it. The pictures should explain what I mean better:
Here is the soaker hose and a few bags of metal stakes to hold the soaker hose in the soil. The soaker hose allows water to seep through itself thus slowly watering the plants around it.
Here is my eight head emitter that is attachted to our main water suplly line. I connected roughly an 8" piece of 1/8" drip line tube to the emitter and used an elbow to attatch the drip line to the soaker hose. This allows me to use a metal stake to secure the soaker hose at the top of our garden soil and also lets me keep the water off the wall and the top of our raised garden frame. Sure we get rain from time to time so it's not a huge deal if water drips onto the wall or frame of our raised garden, but to me it just looks more clean and I don't want to waste any water by watering a wall :)
Here is the soaker hose and a few bags of metal stakes to hold the soaker hose in the soil. The soaker hose allows water to seep through itself thus slowly watering the plants around it.
Here is my eight head emitter that is attachted to our main water suplly line. I connected roughly an 8" piece of 1/8" drip line tube to the emitter and used an elbow to attatch the drip line to the soaker hose. This allows me to use a metal stake to secure the soaker hose at the top of our garden soil and also lets me keep the water off the wall and the top of our raised garden frame. Sure we get rain from time to time so it's not a huge deal if water drips onto the wall or frame of our raised garden, but to me it just looks more clean and I don't want to waste any water by watering a wall :)
Labels:
1/8" drip line,
Arizona,
AZ,
drip system,
how to water your garden,
raised bed garden,
soaker hose,
vegetable garden,
water
Wednesday, October 20, 2010
Finished adding the soil to our raised garden beds!!!
We have finally finshed adding the soil to our raised garden beds! I was able to locate some looking anf feeling garden soil mix at a local yard. Can you believe we needed almost 10,000 pounds of soil!!!
I will upload a bunch of photos soon with all the information as to what I added to our garden soil mix. As for now, I'm installing the soaker hose and will be adding seeds, plants and flowers in the next few days. The best thing about our timingwas that we were hit with a lot of rain last night which thoroughly soaked our raised gardens! Could'nt ask for anything better than that :)
Well stay posted for the pictures of our Arizona raised garden beds!
I will upload a bunch of photos soon with all the information as to what I added to our garden soil mix. As for now, I'm installing the soaker hose and will be adding seeds, plants and flowers in the next few days. The best thing about our timingwas that we were hit with a lot of rain last night which thoroughly soaked our raised gardens! Could'nt ask for anything better than that :)
Well stay posted for the pictures of our Arizona raised garden beds!
Labels:
Arizona,
AZ,
beneficial insects,
building a garden,
flowers,
garden soil,
raised bed garden,
soil mix,
vegetable garden,
vegetables
Friday, June 25, 2010
Let's build our garden bed
OK let's get started!
It's early in June, 2010, Location is somewhere near Phoenix, Arizona. The temperature is around 105 or so. The idea of building a raised garden sprouted in our heads as our family searches for an escape from over processed and chemical filled foods. With disease and sickness part of everyday life, it only made sense to start with the food we eat. This starts our adventure to live healthier, more fulfilling lives.
Our Arizona garden project begins by building a raised garden be approx. 20' x 3' x 12". It started out being two stacked 1" x 6" pine boards, wrapped in a protective 6 mil black plastic to keep the chemicals in the wood from leaching out into the soil. We soon added another 1" x 6" pine board to make the overall height approx. 18" high with 2" or so buried in the ground. We read that this would be the optimal height for growing most everything here in the desert.
Here are a few photos from the building phase of the raised garden bed:
We used three 4" x 4" x 5' posts to support our raised garden bed. We buried these approx. 12" deep seeing that this would be deep enough for support while allowing us a little break from having to dip down really deep in this hard compacted Arizona dirt. The wood we used for the border was 1" x 6" x 10' pine. Along the wall we covered 1/2" plywood with the same 6 mil plastic to help keep any water run off from sneaking through and/or under the wall.
We added a lattice at the entrance of the garden to help support a few cape honey suckle plants - extra shade is always nice in the hot summer :) The plan is to irrigate this raised bed with a drip system running along the back.

It's early in June, 2010, Location is somewhere near Phoenix, Arizona. The temperature is around 105 or so. The idea of building a raised garden sprouted in our heads as our family searches for an escape from over processed and chemical filled foods. With disease and sickness part of everyday life, it only made sense to start with the food we eat. This starts our adventure to live healthier, more fulfilling lives.
Our Arizona garden project begins by building a raised garden be approx. 20' x 3' x 12". It started out being two stacked 1" x 6" pine boards, wrapped in a protective 6 mil black plastic to keep the chemicals in the wood from leaching out into the soil. We soon added another 1" x 6" pine board to make the overall height approx. 18" high with 2" or so buried in the ground. We read that this would be the optimal height for growing most everything here in the desert.
Here are a few photos from the building phase of the raised garden bed:
(This took two of us about half of a really warm Saturday)
We used three 4" x 4" x 5' posts to support our raised garden bed. We buried these approx. 12" deep seeing that this would be deep enough for support while allowing us a little break from having to dip down really deep in this hard compacted Arizona dirt. The wood we used for the border was 1" x 6" x 10' pine. Along the wall we covered 1/2" plywood with the same 6 mil plastic to help keep any water run off from sneaking through and/or under the wall.
We added a lattice at the entrance of the garden to help support a few cape honey suckle plants - extra shade is always nice in the hot summer :) The plan is to irrigate this raised bed with a drip system running along the back.

Labels:
Arizona,
AZ,
basil,
building a garden,
cat nip,
grow corn,
herbs,
irrigation,
raised bed garden,
water
Subscribe to:
Posts (Atom)